DIYPhotoScan

Quick Start Guide

Digitise your precious memories with our Auto-feed Photo Scanner.

Our comprehensive support guide helps you get started quickly and efficiently with step-by-step instructions

1. Download & Install The Software 

Download and install Epson Product Setup onto your computer from the Epson website. This will guide you through setup and install Epson FastFoto software.


Tip:
Make sure to select the correct operating system for your computer.

Installing On Windows

1. Run installation file (.exe)

Allow app changes if prompted

2. Accept terms
    Choose USB connection method

3. Complete & launch
    Launch FastFoto program

Installing On Mac

1. Open installer package

Allow downloads from Epson if prompted

2. Follow installer steps
   Enter Mac password when requested

3. Select USB connection
    Launch FastFoto program

2. Connect The Hardware
  1. Carefully remove the red security clips from the scanner lid and discard them.
  2. Take out the scanner and all included accessories from the box. 
    - Please keep all packaging materials, accessories, and foam inserts safe, as these will be required when returning the scanner.
  3. Connect the power cable to the scanner and plug it into a mains power supply.
  4. Connect the USB cable to both the scanner and your computer.
    For the best performance, we strongly recommend using the USB connection rather than WiFi, as this provides a faster and more reliable scanning experience.
  5. If your computer only has USB-C ports, a compatible adapter has been included in the box for your convenience.
bandicam
3. Complete The Setup
  1. Follow the software installation process to check the scanner is correctly connected.
  2. Before scanning, restart your computer.
  3. Launch the FastFoto software.
Software
4. Prepare Your Photos For Scanning
  1. Sort By Size - Organise photos by size (e.g., all 4×6 photos together) to ensure smooth feeding through the scanner.
  2. Remove Attachments - Take off any staples, paper clips, sticky notes or tape that could damage the scanner or cause jams.
  3. Load Properly - Insert up to 36 photos face up in the input tray; mixed orientations are supported by the software.
  4. Adjust Settings - Position the input tray guides to match your photo size and extend the output tray fully.


Tip: Scan smaller or delicate photos individually to prevent jams and ensure quality.

Photo Sorting
5. Load Photos Into The Scanner
  1. Insert photos into the feed tray facing you with the top edge first.
  2. Adjust holders to the correct size to support the photos.


Tip: Ensure photos are straight and not curled to prevent feeding problems.

img1
6. Start Scanning
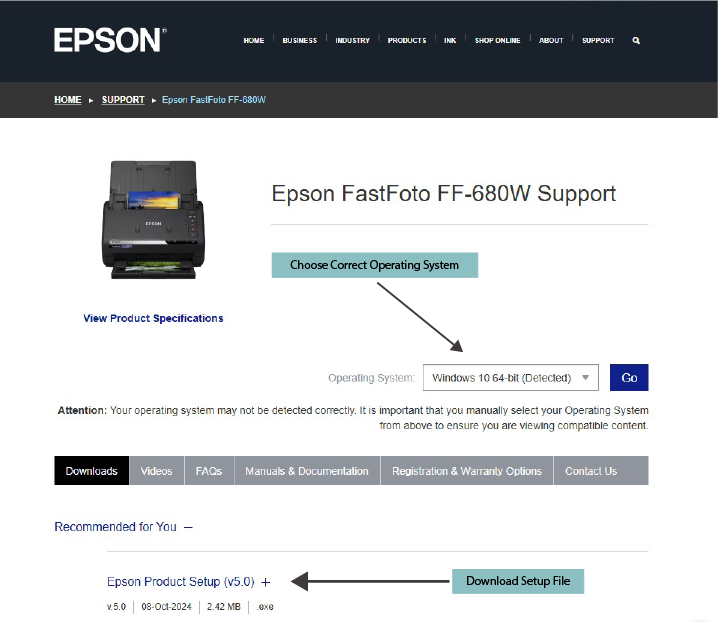
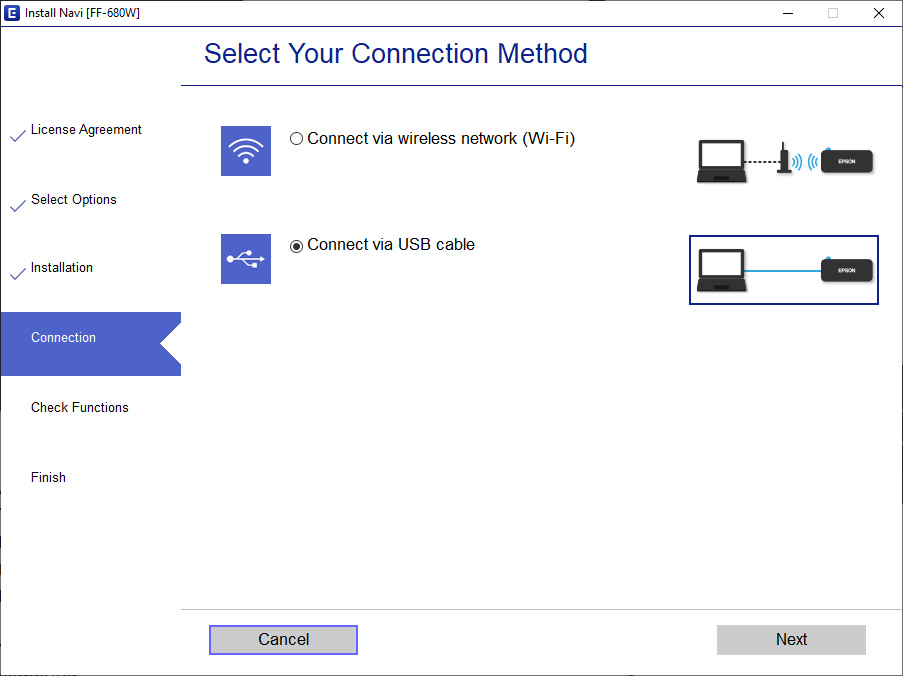
  1. Launch the Epson FastFoto Software on your computer (if it’s not already open)
  2. Go to Settings if you’d like to adjust options such as:

    • Scan sides (front only or front and back).

    • Auto-enhance (to improve faded or old photos).

    • Resolution (300 dpi for standard use, 600 dpi for higher quality).

  3. In Settings, you can also:

    • Choose where to save your scanned files.

    • Name your destination folder.

  4. Once your settings are ready, click Scan to begin.
  5. Add the next set of photos when prompted and continue.


Tip: By default, scans are saved in your Pictures folder, and the default settings work well for most users.


Auto Scan Feeder
×
Select dates
My details
Summary
3 Days
£85.95
7 Days
£95.95
14 Days
£135.95
30 Days
£165.95

Delivery available Mon-Fri

Arrives by midday

start date

Drop at return point by midday

end date

Free Delivery & Return

£85.95

Start:
End:

Fees

£85.95

Total:

£85.95